


The Custom Home Construction Process From Excavation to Final Walkthrough
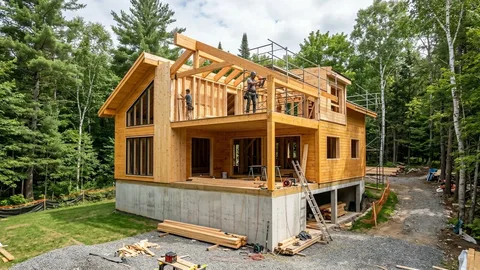
A custom home starts with careful planning long before equipment reaches the site. For WBP CONTRACTING LLC, that work includes turning design ideas into clear plans, schedules, budgets, and construction steps. The build then moves through site preparation, excavation, foundation work, framing, interior systems, finishes, inspections, and closeout. Knowing the custom home construction process lets a homeowner make better choices and understand what should happen at each stage.
Key Takeaways
-
Site surveys, soil checks, permits, and complete plans should come before major site work.
-
Excavation and foundation work create the base for every later part of the home.
-
Framing, roofing, windows, plumbing, electrical, and HVAC work must be coordinated closely.
-
The final walkthrough should cover both visible finishes and important project records.
The exact schedule depends on the home’s size, design, site conditions, material choices, weather, inspections, and local rules. Still, the order of work usually follows a clear path. A strong plan reduces confusion, while written decisions help control delays and change orders.
What the Custom Home Construction Process Covers
The process begins with design development and site review, not excavation. The homeowner, designer, and builder must understand the lot, the floor plan, utility needs, drainage, access, and local approval rules. Once the plans are ready, the team can set a budget, prepare a contract, request permits, and create a construction schedule.
After approval, the site is prepared and the ground is shaped for the home. The foundation follows, then framing creates the basic form of the building. The next steps include roofing, windows, exterior protection, plumbing, electrical work, heating and cooling systems, insulation, drywall, cabinets, flooring, paint, fixtures, and final testing.
Each stage depends on the one before it. For example, a framing change can affect wiring, ductwork, drywall, and finish materials. That is why a homeowner should treat the project as one connected system rather than a series of separate tasks.
Stage 1: Before Construction Begins
The initial stage of the custom home construction process focuses on reducing uncertainty before construction begins. A land survey establishes property boundaries and identifies key site features, while soil testing reveals conditions that may affect foundation design. The site plan should also account for property access, grading, stormwater flow, driveways, utilities, and the home's placement on the lot.
Plans should be detailed enough for the construction team to price the work fairly. They should show room sizes, window locations, roof design, exterior materials, cabinets, plumbing fixtures, lighting, and major mechanical systems. Vague plans often lead to allowances, which are estimated amounts for items that have not yet been selected.
A common question is whether permits must be approved before excavation. In most projects, the required building permit and related approvals should be in place before regulated work begins. Local requirements vary, so the project team should confirm which permits, inspections, utility approvals, and site documents apply to the property.
The written contract also deserves close attention. It should explain the scope of work, payment schedule, allowances, insurance duties, warranty terms, completion standards, and the process for approving changes. A change order should describe what is changing, why it is changing, and how it affects cost and time.
Planning Checkpoints
-
Confirm the survey, soil information, site plan, and utility locations.
-
Review the drawings and finish selections before signing the final scope.
-
Identify allowances and ask how unused or added amounts will be handled.
-
Put change approval, payment steps, inspections, and warranty duties in writing.
Stage 2: Site Preparation and Excavation
Once approvals and site plans are ready, crews can prepare the lot. This may involve clearing plants, removing unsuitable material, setting temporary access, marking utility areas, and establishing erosion or drainage controls. The goal is to create a safe work area and prepare the ground for the foundation.
Excavation must match the approved foundation plan. The depth and shape of the dig depend on the home design, soil, slope, and foundation type. Crews may remove soil, bring in approved fill, or compact the ground in layers. Poor compaction can cause movement later, so this work should not be rushed.
Grading is also important. The lot should direct water away from the home while supporting driveways, walkways, patios, and future landscaping. A homeowner should ask how temporary water will be managed during construction and how the final drainage plan will protect the finished structure.
Unexpected rock, groundwater, weak soil, or buried materials can change the plan. If conditions differ from the original assumptions, the team should stop, document the issue, explain the options, and obtain written approval before adding major work.
Stage 3: The Foundation Takes Shape
For custom home builders, soil, slope, drainage, and local inspection requirements can vary from one property to another. The foundation design should come from the approved plans and site information rather than a general assumption about the land. Depending on the design, the home may use a slab, crawl space, basement, or another foundation system.
Foundation work includes forming or digging the base, placing reinforcement, installing required plumbing lines, pouring concrete, and allowing the material to gain strength. Waterproofing, drainage layers, anchor points, and termite protection may also be part of the work, depending on the plans and local rules.
Inspections often occur before concrete covers important work. The inspection process gives the proper authority a chance to review items such as reinforcement, footing depth, plumbing below the slab, or other required details. The project record should show which inspections were completed and whether corrections were needed.
After the foundation is accepted, crews can backfill carefully and begin setting the structure above it. A homeowner should keep copies of foundation drawings, inspection records, soil reports, and any approved changes. These records can help answer questions years after the home is finished.
Foundation Milestones
-
Confirm the excavation matches the approved plans before concrete work begins.
-
Check reinforcement, underground plumbing, anchors, drainage, and waterproofing as required.
-
Record inspection results and resolve corrections before covering the work.
-
Protect the foundation during backfill and confirm that final grades will move water away.
Stage 4: Framing, Rough-Ins, and the Exterior Shell
In Texas home construction, the exterior shell must handle the local site demands while matching the approved design. Framing forms the walls, floors, roof shape, stair openings, and major room spaces. At this point, the home becomes easier to measure, inspect, and compare with the drawings.
The framing stage is also the right time to check window sizes, door swings, ceiling heights, roof lines, and large openings. Small errors are easier to fix before insulation and drywall cover the structure. A careful review can prevent problems with cabinets, appliances, stair parts, and built-in features later.
After framing, crews install roofing, windows, exterior doors, flashing, and weather barriers. These parts help keep water and air from entering the home. Their installation must be coordinated, since gaps around windows, roof edges, and wall openings can create moisture problems if they are not sealed correctly.
Rough-ins come next. Plumbers place supply and drain lines, electricians run wires and set boxes, and HVAC crews install ducts and equipment lines. The homeowner should confirm outlet locations, lighting points, thermostat locations, appliance connections, and special wiring before the walls are closed.
Rough inspections happen before insulation and drywall hide these systems. A photo record of covered plumbing, wiring, and duct routes is also useful. It can help with future repairs when the location of a pipe or cable is not easy to see.
Stage 5: Interior Build-Out and Finish Work
Insulation and air sealing improve comfort and help control unwanted air movement. The selected insulation must fit the wall, ceiling, and floor assemblies shown in the plans. After the required inspection, drywall can be installed, taped, sanded, and prepared for paint.
Finish work makes the house feel complete, but it depends on earlier decisions. Cabinets, countertops, tile, flooring, trim, doors, paint, plumbing fixtures, lighting, and appliances must fit together. Selections made late can delay installation or force substitutions, so a homeowner should finalize important choices before the related work begins.
A useful practice is to keep a finish schedule with product names, colors, sizes, quantities, and approved alternates. The schedule gives the team one place to check details and helps prevent mismatched materials. It also makes it easier to identify what still needs to be ordered.
Testing should continue as work nears completion. Doors and windows should operate correctly, plumbing fixtures should be checked for leaks, electrical devices should be tested, and heating and cooling equipment should be started according to the manufacturer’s instructions.
Important Decisions Before Work Begins
The lowest starting price is not always the clearest or most complete price. A homeowner should compare the full scope, including site work, foundation details, utility connections, permits, temporary services, appliances, landscaping, cleanup, and final testing. Missing items can create pressure later even when the original estimate seemed attractive.
The site itself should influence the decision. A sloped lot, long driveway, limited access, poor soil, or distant utility connection may require extra planning. The team should explain these conditions in plain language and show how each one affects the plan, budget, and schedule.
Communication is another important factor. The contract should name the person who approves drawings, selections, changes, and payments. Regular site meetings or written updates can keep decisions moving. When a question arises, written answers are safer than relying on memory or informal conversations.
A homeowner should also review how quality will be checked. The contract may describe acceptable finish standards, inspection steps, correction periods, and warranty procedures. Clear expectations help both sides identify issues early instead of waiting until the final walkthrough.
The Final Walkthrough and Handover
The final walkthrough is more than a quick look at paint and countertops. The homeowner and project team should move through every room and compare the finished home with the plans, selections, and approved changes. They should test doors, windows, locks, lights, outlets, faucets, toilets, appliances, fans, thermostats, and other installed equipment.
Any unfinished or incorrect item should be recorded on a punch list. Each item needs enough detail to identify the location and required correction. For example, a note should say which door needs adjustment rather than simply stating that something is wrong.
The closeout package may include inspection approvals, equipment manuals, product warranties, paint colors, appliance information, maintenance instructions, and as-built details. The homeowner should know who to contact if a problem appears after move-in and how warranty requests must be submitted.
A common question is whether the final walkthrough happens before or after the last inspection. The order depends on the local authority and the contract, but both steps matter. A final building inspection confirms required code items, while the walkthrough checks the home against the agreed scope and finish quality.
Final Handover Checks
-
Test installed systems, fixtures, appliances, windows, doors, outlets, and lights.
-
Record every punch-list item with its location and needed correction.
-
Collect inspection records, manuals, warranties, finish details, and maintenance information.
-
Confirm keys, access devices, utility information, and the process for future service requests.
Common Mistakes That Cause Trouble
Starting site work before plans, approvals, and soil information are complete can create expensive changes. Even a small shift in the home’s location may affect grading, utilities, driveway access, and drainage. The project should not move ahead on assumptions that have not been checked.
Another mistake is making finish choices one room at a time without reviewing the whole home. Flooring heights can affect doors, cabinet layouts can affect outlets, and fixture sizes can affect plumbing locations. A complete selection review helps catch these links early.
Homeowners can also overlook the difference between substantial completion and full closeout. A home may appear ready while manuals, inspection records, small repairs, or final approvals remain unfinished. The project should close only when the written scope, required approvals, and agreed corrections have been addressed.
Frequently Asked Questions
How Long Does a Custom Home Build Take?
The timeline depends on design complexity, lot conditions, permit review, weather, inspections, material availability, and the speed of owner decisions. A written schedule should show major stages and note which decisions could affect completion.
Why Is a Soil Test Important?
A soil test helps the design team understand how the ground may support the home and manage water. Its findings can influence foundation details, excavation methods, drainage work, and the need for special preparation.
When Should a Homeowner Choose Finishes?
Major selections should be made before the related materials must be ordered or installed. Early choices for windows, doors, cabinets, tile, flooring, fixtures, and appliances reduce the chance of delays or unsuitable substitutions.
What Is a Change Order?
A change order is a written approval for work that differs from the original contract. It should explain the added or removed work, price adjustment, schedule effect, and any new material or design details.
What Should Be Kept After the Home Is Finished?
The homeowner should keep the final plans, inspection records, warranties, manuals, finish schedule, paint information, equipment details, and approved change records. These documents support maintenance and future repairs.
A Clear Path From Soil to Home
A successful build depends on connected decisions rather than one impressive construction moment. Site information shapes excavation, excavation supports the foundation, the foundation supports framing, and the framed shell allows the interior systems and finishes to come together. Careful records, timely inspections, clear selections, and a detailed final walkthrough help the homeowner receive a home that matches the approved plan as closely as possible.
Plan the Next Step
An early conversation with a qualified local builder can turn a broad home idea into a workable plan. Before that meeting, a homeowner can gather the survey, wish list, budget range, preferred timing, and questions about site work. The next step is to compare written scopes, confirm who handles permits and inspections, and review how changes will be priced. Clear records at the start make each later decision easier and help the finished home match the original goals with confidence.
 Russian
 English
 Arabic
 French
 Spanish
 Portuguese
 Deutsch
 Turkish
 Dutch
 Italiano
 Romaian
 Portuguese (Brazil)
 Greek